Unitree G1 × ROH-LitEDU
硬件安装说明书|左右灵巧手、扩展板及电源/通信布线ハードウェア取付説明書|左右ハンド、拡張基板、電源・通信配線Hardware Installation Manual | Left/Right Hands, Expansion Board, and Power/Communication Wiring
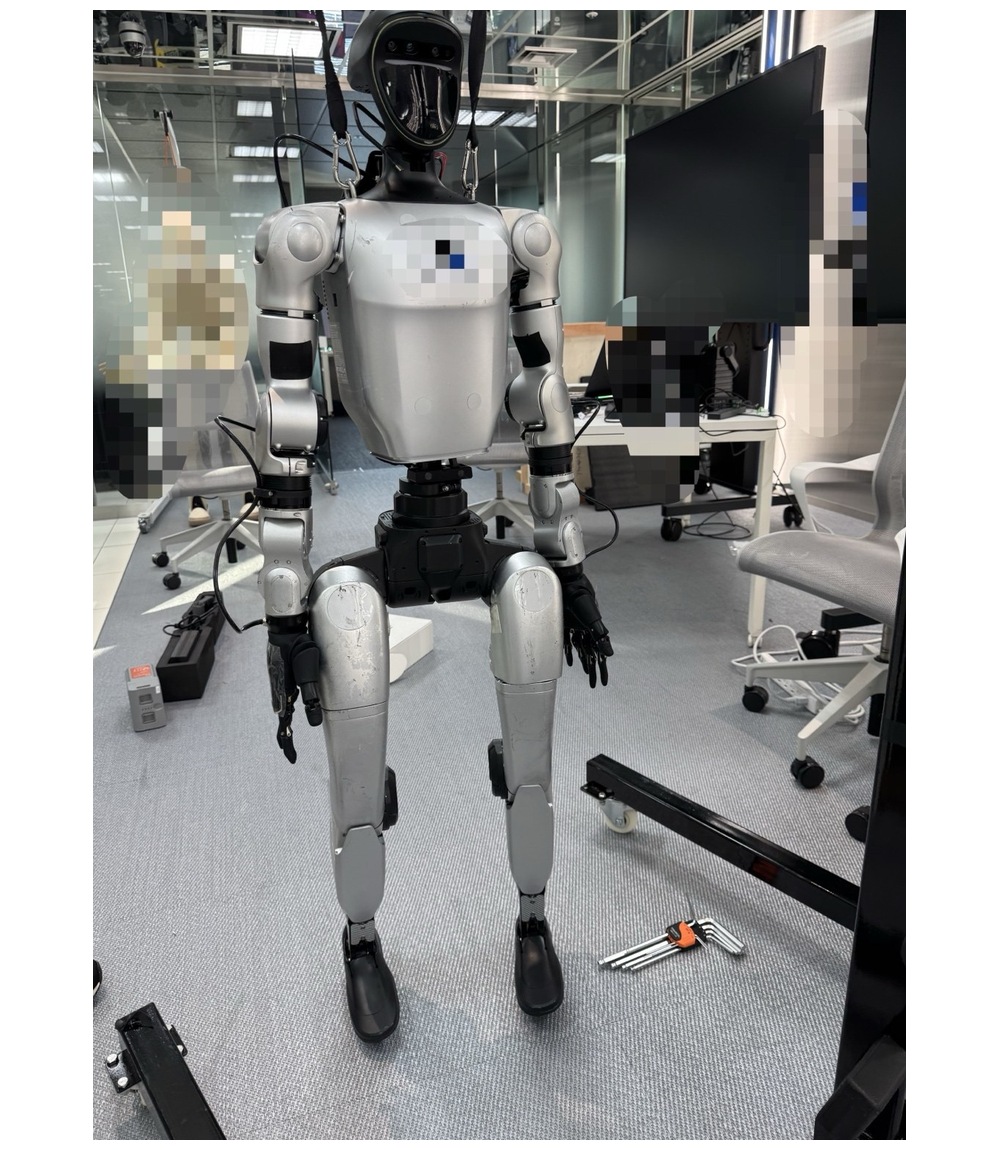
安装前准备取付前の準備Preparation
本说明书仅包含机械安装、接线、动作确认和最终收线,不包含 SDK、DDS 及编程内容。
本書は機械取付、配線、動作確認、最終配線処理のみを対象とし、SDK、DDS、プログラミング内容は含みません。
This manual covers mechanical installation, wiring, operation checks, and final cable routing only. SDK, DDS, and programming are not included.
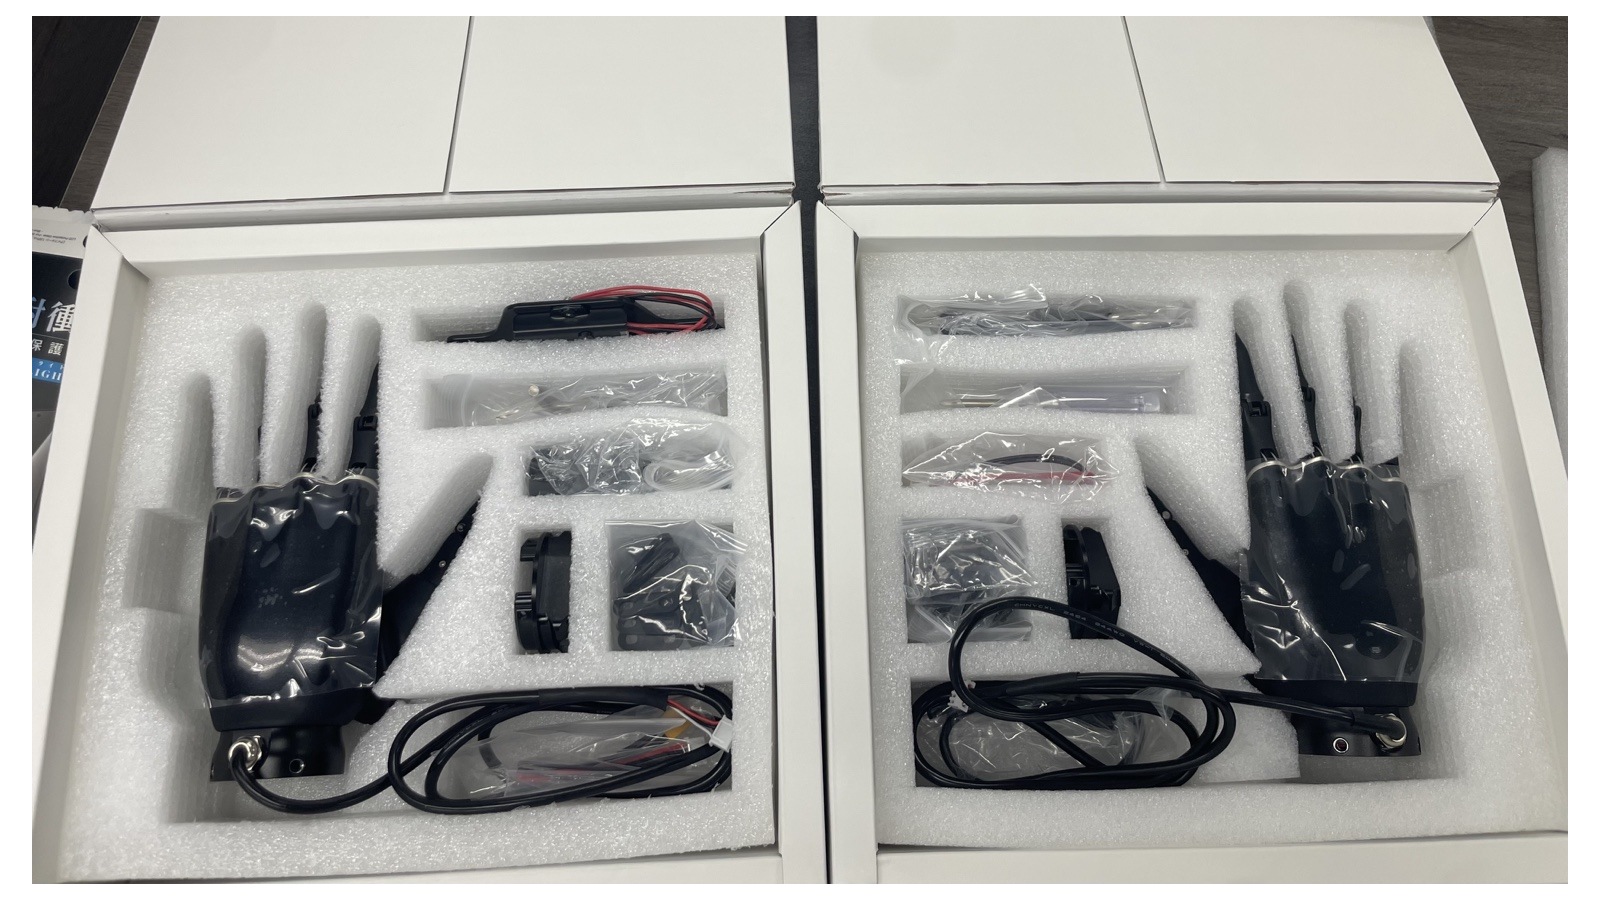
主要部件与工具主な部品と工具Main Parts & Tools
| 主要部件主な部品Main Parts | 建议工具推奨工具Recommended Tools |
|---|---|
| 左右灵巧手、专用线束及端子左右ハンド、専用ハーネス・端子Left/right ROH-LitEDU hands, dedicated harnesses and terminals | 内六角扳手、数字万用表六角レンチ、デジタルテスターHex key set, digital multimeter |
| 扩展板、安装板、保护盖、M6×18 螺钉拡張基板、取付板、保護カバー、M6×18 ねじExpansion board, mounting plate, protective cover, M6×18 screws | 扎带或魔术贴、绝缘工具結束バンドまたは面ファスナー、絶縁工具Cable ties or hook-and-loop straps, insulated tools |
安全注意事项安全上の注意Safety Precautions
- 作业前关闭机器人主电源,并确认机器人处于无动作状态。
- 使用维护支架或吊装带可靠支撑机器人,原则上由两人协同作业。
- 严禁带电插拔 24V 电源及灵巧手连接器。
- 严格区分 BAT 24V 与相邻 12V 端口,连接前核对标识和电压。
- 动作确认完成前只做临时理线,不进行最终绑扎。
- 作業前にロボットの主電源を切り、無動作状態であることを確認します。
- メンテナンススタンドまたは吊りベルトで確実に支持し、原則 2 名で作業します。
- 24V 電源およびハンドコネクタの活線挿抜は禁止です。
- BAT 24V と隣接する 12V 端子を区別し、接続前に表示と電圧を確認します。
- 動作確認が完了するまでは仮配線のみとし、最終固定は行いません。
- Turn off the robot main power and confirm that the robot is not moving before starting work.
- Support the robot securely with a maintenance stand or suspension straps. As a rule, perform the work with two people.
- Do not connect or disconnect the 24V power connector or hand connectors while energized.
- Clearly distinguish BAT 24V from the adjacent 12V port. Verify the label and voltage before connection.
- Until the operation check is complete, route the cables temporarily only; do not perform final fastening.
端子组装(仅限未预装产品)端子組立(未組立製品のみ)Terminal Assembly (Only for Units Without Preassembled Terminals)
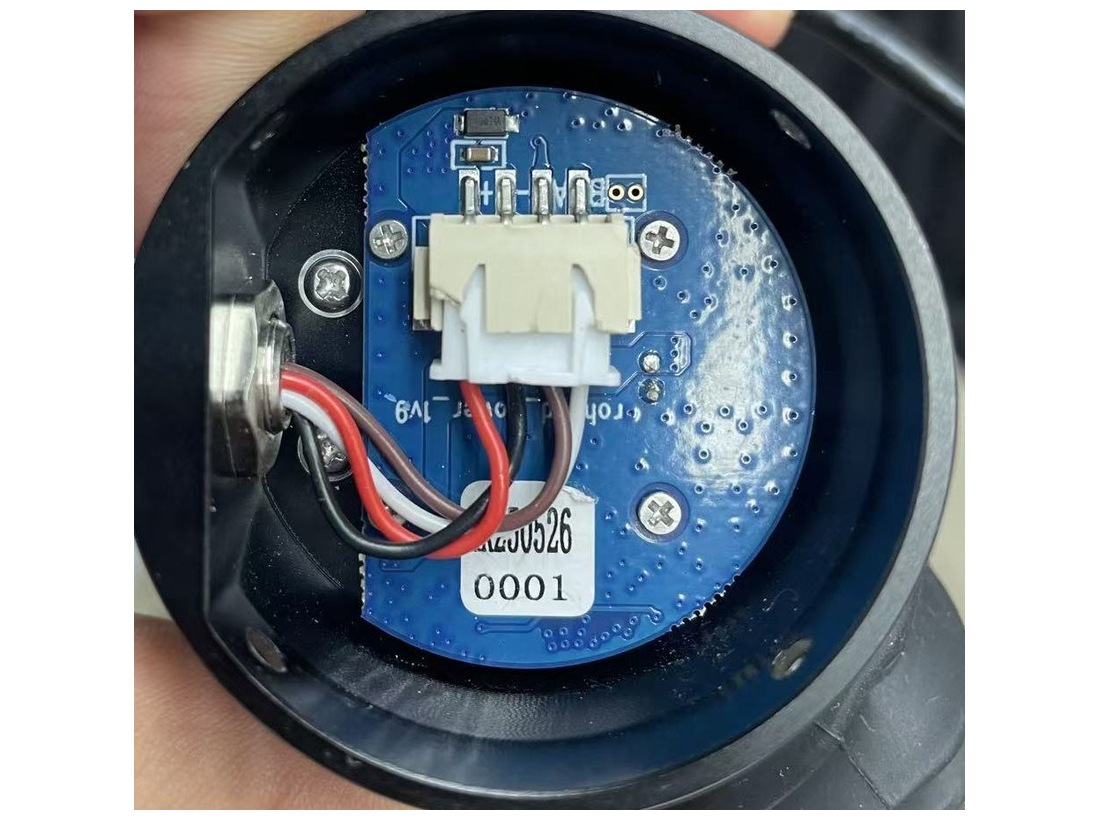
- 将线束固定端子安装在线束上,避免拉力直接作用于导线或针脚。
- 按图示方向握持端子,从左至右依次为“红、黑、棕、白”。
- 确认各端子均已插到底,无松脱、芯线外露或绝缘皮夹入。
- ハーネス固定端子を取り付け、導線や端子に引張荷重が直接加わらないようにします。
- 図と同じ向きでコネクタを保持し、左から「赤、黒、茶、白」の順に挿入します。
- 各端子が奥まで挿入され、抜け、芯線露出、被覆噛み込みがないことを確認します。
- Fit the harness retaining terminal so that tensile load is not applied directly to the wires or connector pins.
- Hold the connector in the orientation shown and insert the wires from left to right in the order: Red, Black, Brown, White.
- Confirm that all terminals are fully inserted, with no looseness, exposed conductors, or pinched insulation.
左右灵巧手机械安装左右ハンドの機械取付Hand Mechanical Installation
左右两侧基本步骤相同。安装前确认左/右手型号、手掌朝向、线缆出口方向及转接件方向。
左右とも基本手順は同じです。作業前に左右ハンド型式、掌方向、ケーブル出口方向、アダプタ方向を確認します。
The basic procedure is the same for both sides. Before installation, verify the left/right hand model, palm orientation, cable exit direction, and adapter orientation.
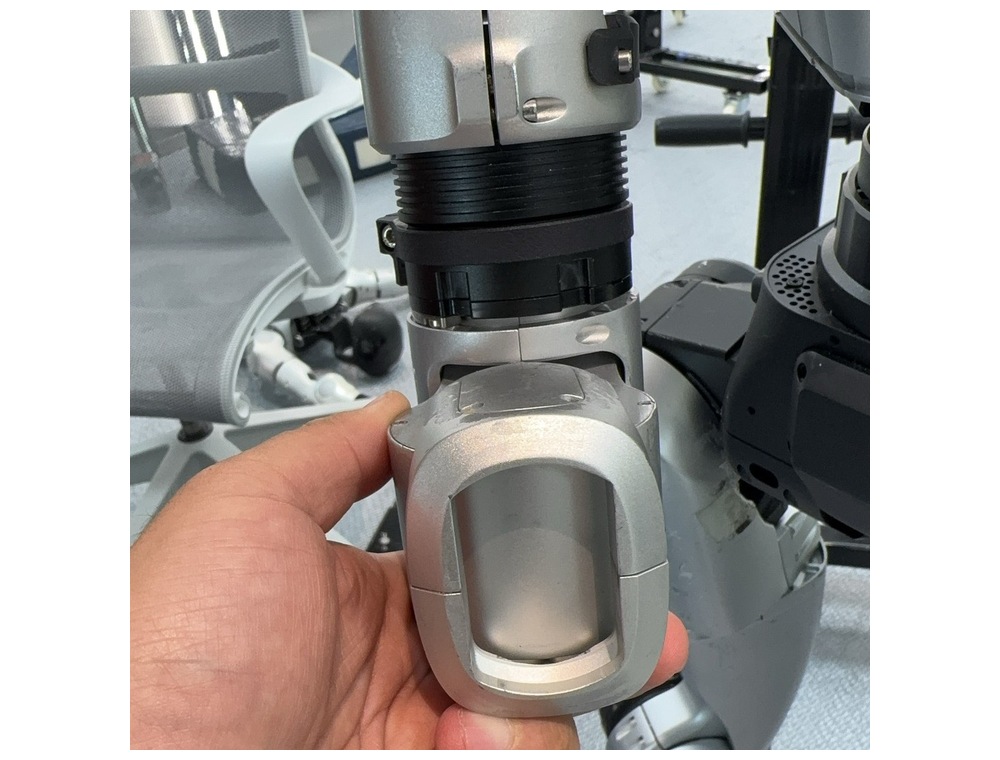
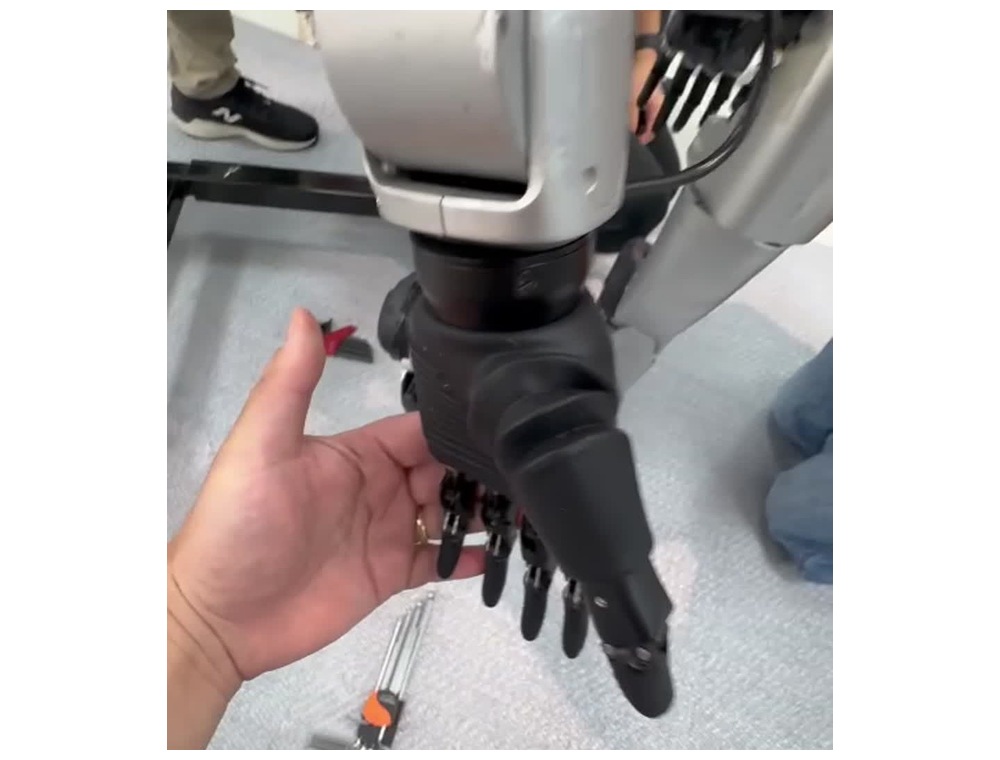
- 将 G1 可靠支撑,并将待安装手臂调整到便于作业的位置。
- 拆下原有末端件或保护盖,确认安装面、螺纹孔及线缆通道内无异物。
- 一人托住 ROH-LitEDU,另一人对准中心、方向和固定孔位。
- 全部螺钉先预紧,再按对角顺序均匀锁紧。
- 轻扶灵巧手确认无松动,缓慢转动腕部,确认线缆未被夹住或扭转。
- 此阶段仅将线缆自然引向上方并保留充分余量。
- G1 を確実に支持し、取付側の腕を作業しやすい位置に調整します。
- 既設エンド部品または保護カバーを外し、取付面、ねじ穴、ケーブル経路に異物がないことを確認します。
- 1 名が ROH-LitEDU を保持し、もう 1 名が中心、方向、固定穴を合わせます。
- 全ねじを仮締め後、対角順に均等締結します。
- ハンドのガタつきを確認し、手首をゆっくり動かしてケーブルの噛み込みやねじれがないことを確認します。
- この段階ではケーブルを上方へ仮配線し、十分な余長を残します。
- Support the G1 securely and position the arm to be fitted so it is easy to work on.
- Remove the existing end component or protective cover, and confirm that the mounting surface, threaded holes, and cable path are free of foreign objects.
- One person supports the ROH-LitEDU while the other aligns the center, orientation, and mounting holes.
- Pre-tighten all screws first, then tighten them evenly in a diagonal sequence.
- Gently check the hand for looseness, then slowly move the wrist and confirm that the cable is not pinched or twisted.
- At this stage, route the cable upward only temporarily and leave sufficient slack.
扩展板安装拡張基板の取付Expansion Board Installation
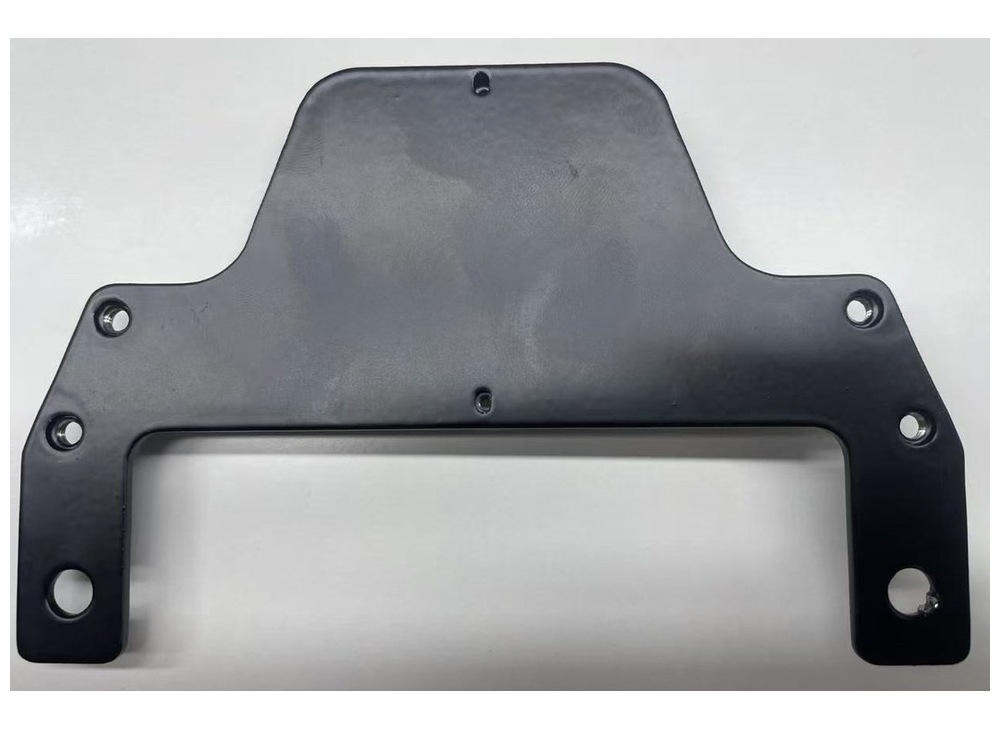
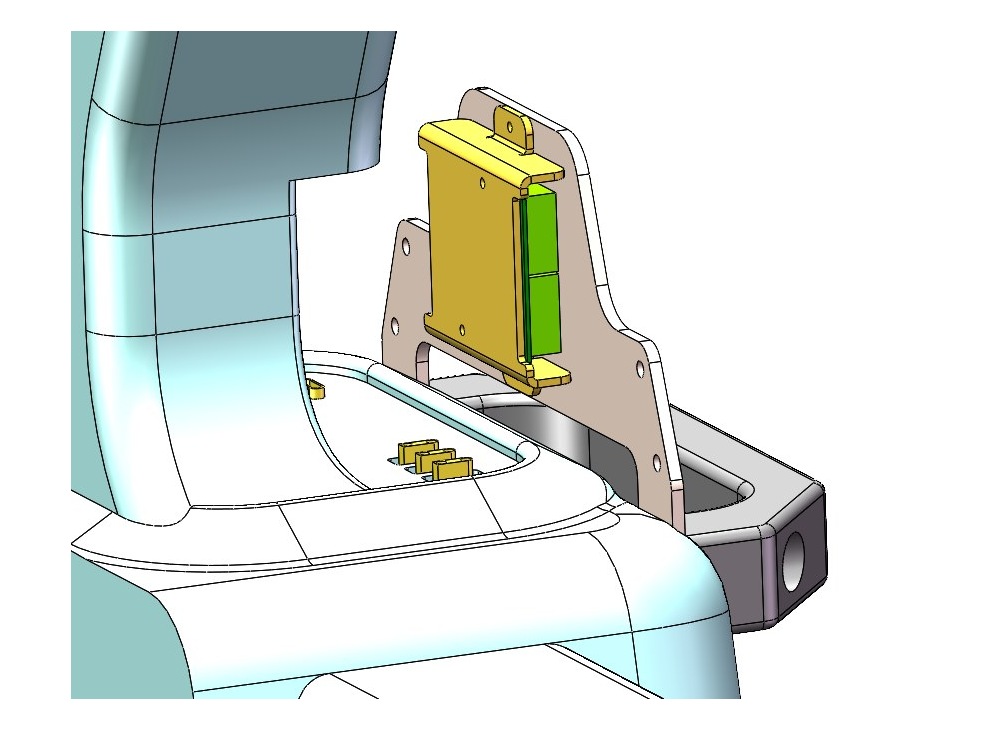
- 拆下 G1 颈部安全固定扶手(前部把手),妥善保管原螺钉。
- 将扩展板安装板置于安全扶手与 G1 本体之间,电路板一侧朝内,平滑保护面朝外。
- 对齐孔位,使用配件中的 M6×18 螺钉全部预紧后,再均匀锁紧。
- 保持保护盖打开,便于后续接线。
- G1 首部の安全固定ハンドル(前部ハンドル)を取り外し、元のねじを保管します。
- 取付板を安全ハンドルと G1 本体の間に配置し、基板側を内側、平滑な保護面を外側にします。
- 穴位置を合わせ、付属の M6×18 ねじをすべて仮締め後、均等に本締めします。
- 後続の配線作業のため、保護カバーは開いた状態にしておきます。
- Remove the G1 neck safety handle (front handle) and keep the original screws in a safe place.
- Place the expansion-board mounting plate between the safety handle and the G1 body, with the board side facing inward and the smooth protective surface facing outward.
- Align the holes, pre-tighten all supplied M6×18 screws, and then tighten them evenly.
- Keep the protective cover open for the following wiring work.
扩展板接口说明拡張基板コネクタExpansion Board Connector Layout
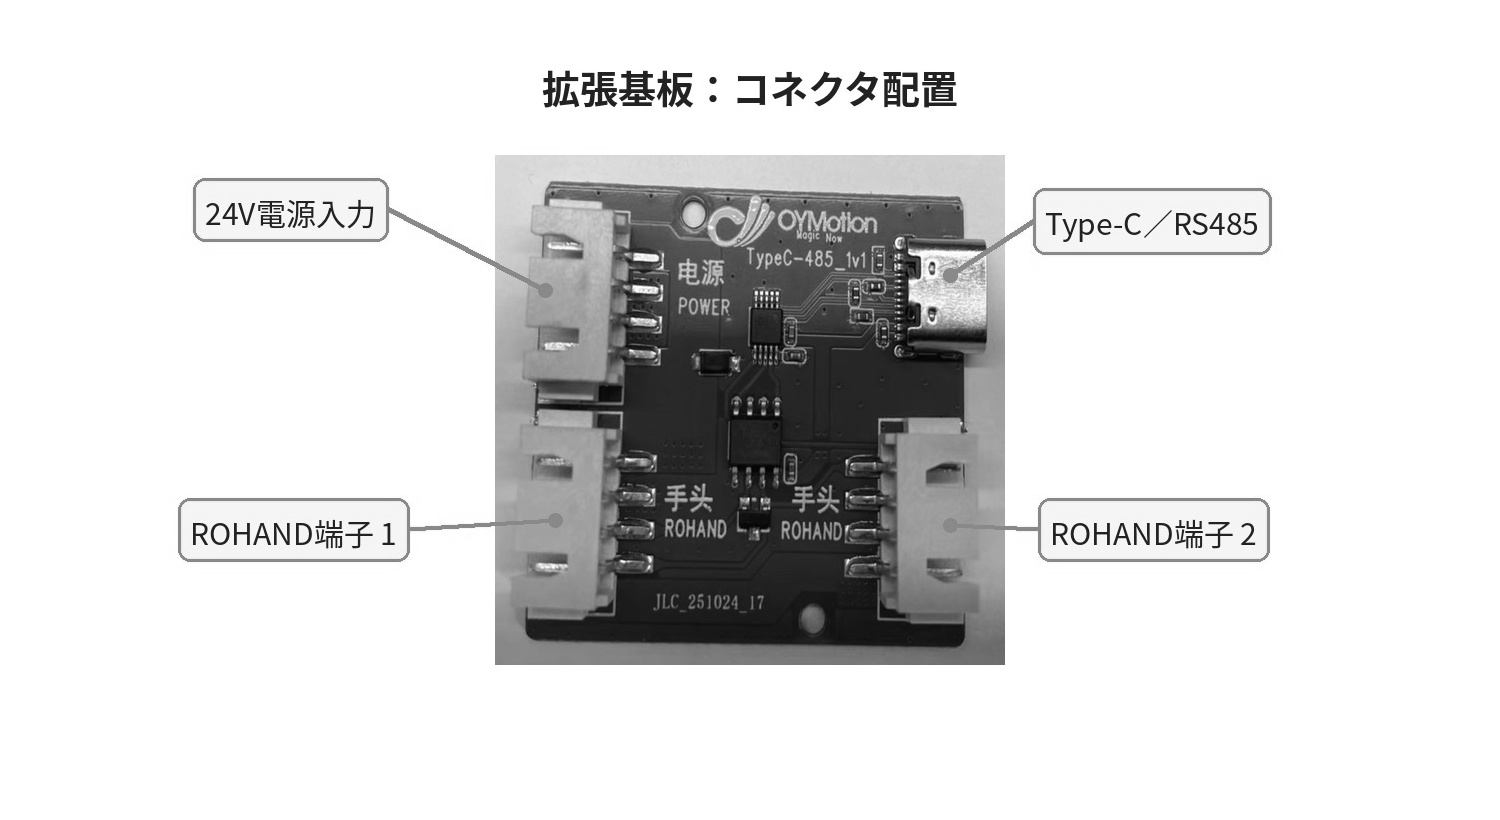
左右手线束连接左右ハンドハーネスの接続Hand Harness Connection
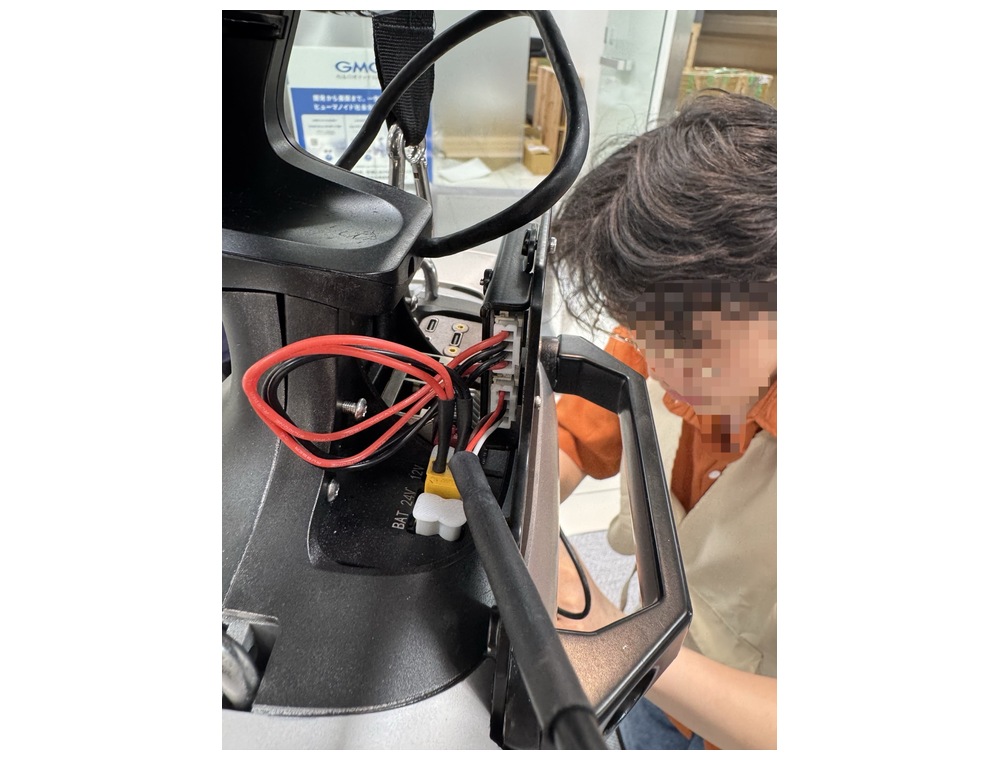
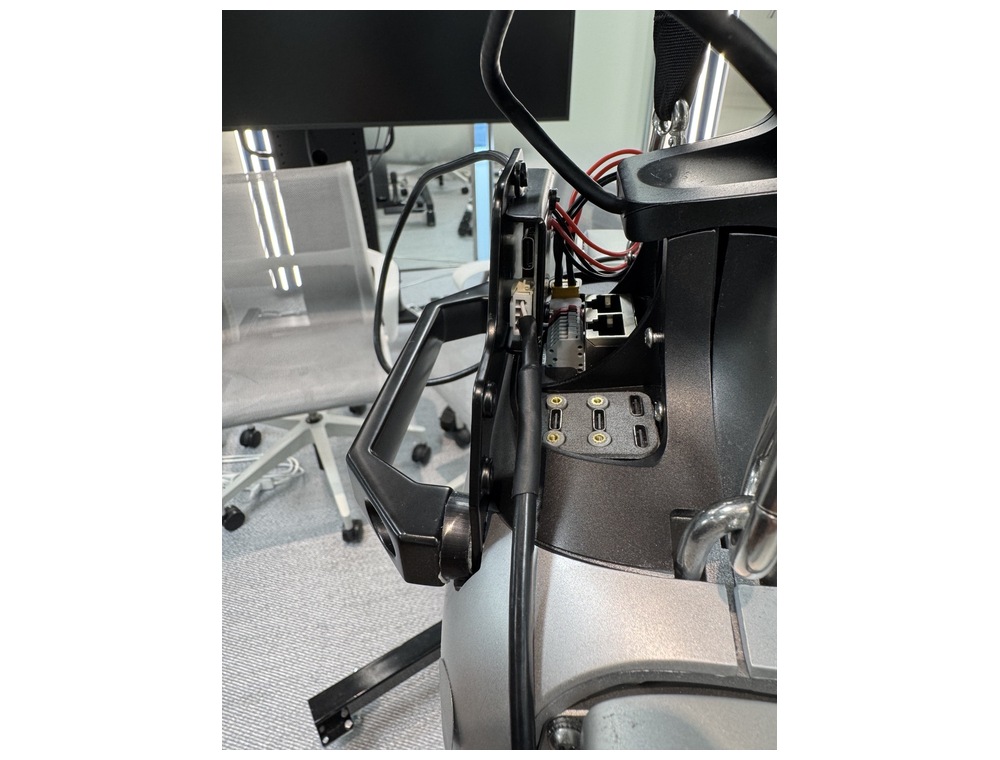
建议先连接空间较窄、较难操作的一侧,再连接另一侧。左右判断以 G1 本体为准。
作業空間が狭く接続しにくい側を先に接続し、その後もう一方を接続します。左右判定は G1 本体基準で行ってください。
Connect the side with less working space first, then connect the other side. Determine left and right based on the G1 robot body.
- 确认机器人主电源处于关闭状态。
- 将一侧灵巧手线束引至扩展板,对准 ROHAND 端子锁扣并平直插到底。
- 轻拉连接器外壳确认锁扣可靠,不得拉拽导线。
- 按相同方法连接另一侧灵巧手线束。
- 确认左右线束无交叉拉紧,并在腕、肘、肩各关节处保留足够余量。
- ロボットの主電源が OFF であることを確認します。
- 片側のハンドハーネスを拡張基板へ引き回し、ROHAND 端子のロック向きを合わせてまっすぐ奥まで挿入します。
- コネクタハウジングを軽く引いてロックを確認し、導線を引っ張らないでください。
- 同じ方法でもう一方のハンドハーネスを接続します。
- 左右ハーネスが交差して張っていないこと、手首、肘、肩に十分な余長があることを確認します。
- Confirm that the robot main power is OFF.
- Route one hand harness to the expansion board, align the ROHAND connector latch, and insert it straight in until fully seated.
- Lightly pull the connector housing to confirm that it is locked. Do not pull on the wires.
- Connect the other hand harness in the same way.
- Confirm that the left and right harnesses are not crossed or under tension, and that sufficient slack remains at the wrist, elbow, and shoulder joints.
电源与通信连接電源・通信接続Power & Communication Connection
6.1 BAT 24V 电源電源Power
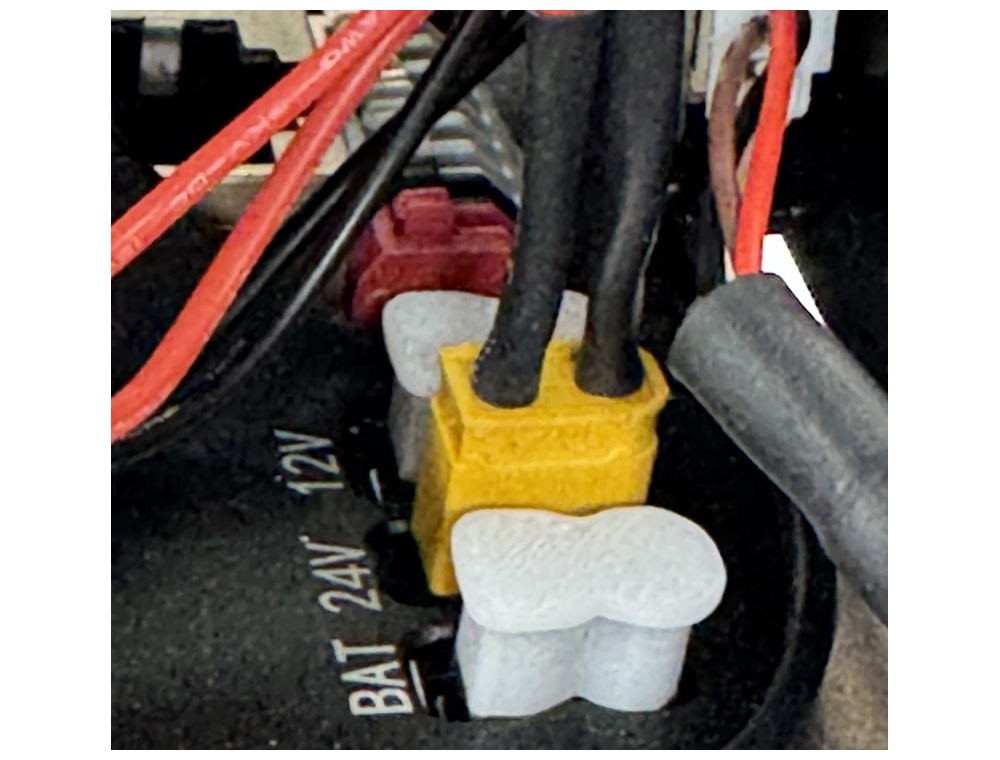
- 确认“BAT 24V”标识,禁止连接至相邻 12V 端口。
- 使用数字万用表确认输出为 24V 直流并核对极性。
- 按连接器方向插入电源线,确认锁扣到位。
- 「BAT 24V」表示を確認し、隣接する 12V 端子へ接続しないでください。
- デジタルテスターで DC24V 出力と極性を確認します。
- コネクタ方向を合わせて電源ケーブルを挿入し、ロックを確認します。
- Confirm the “BAT 24V” label. Do not connect to the adjacent 12V port.
- Use a digital multimeter to verify 24V DC output and confirm polarity.
- Insert the power cable in the correct connector orientation and confirm that the latch is fully engaged.
6.2 Type-C 通信线通信ケーブルCommunication Cable
- 确认扩展板侧 Type-C/RS485 接口已连接可靠。
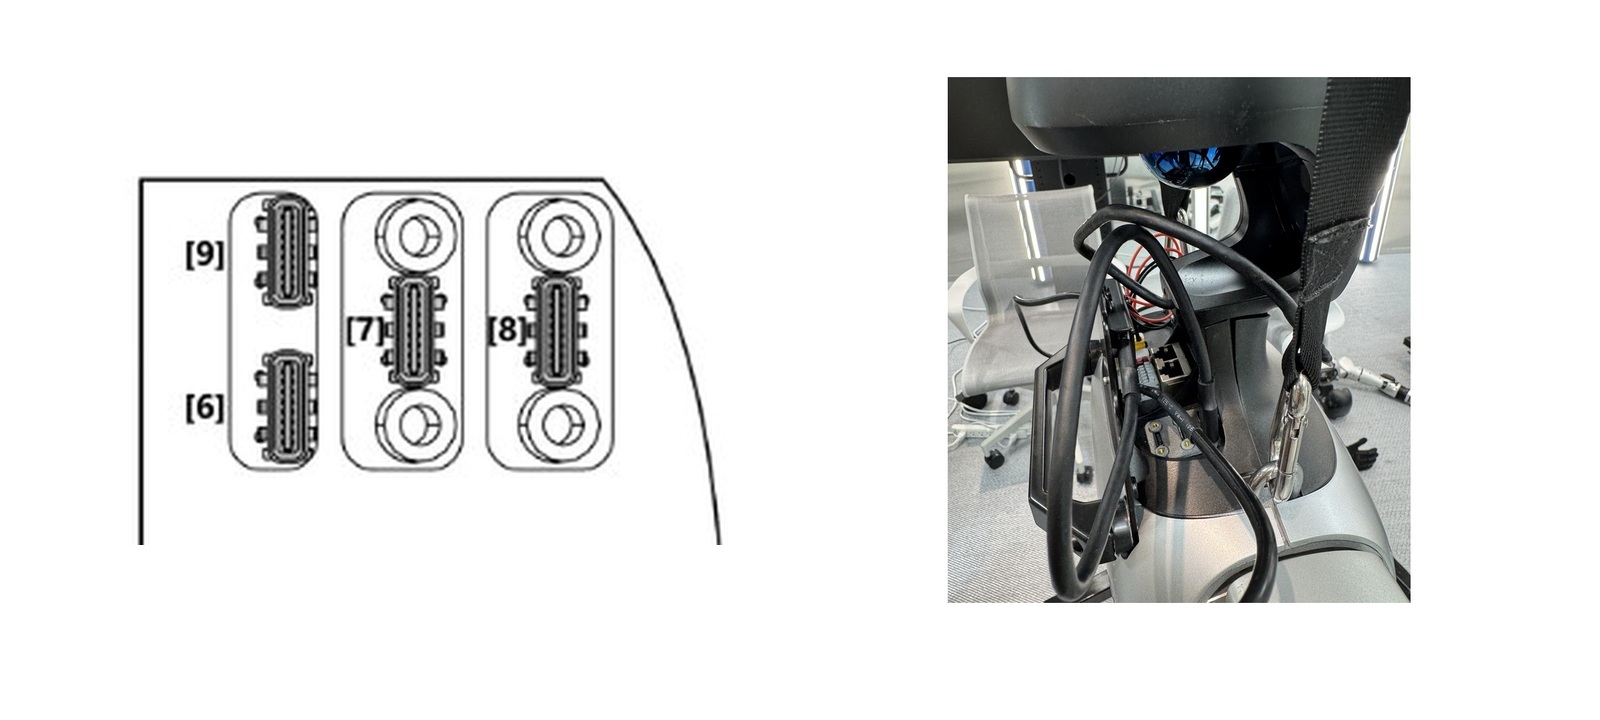
- G1 侧连接至 No.6、No.7 或 No.8 任一 Type-C 端口;No.9 不用于本配置。
- 确认线缆未遮挡 RJ45、其他 USB 端口及固定螺钉。
- 拡張基板側の Type-C/RS485 接続を確認します。
- G1 側は No.6、No.7、No.8 のいずれかへ接続します。No.9 は本構成では使用しません。
- ケーブルが RJ45、他の USB 端子、固定ねじを塞いでいないことを確認します。
- Confirm that the Type-C/RS485 connection on the expansion-board side is secure.
- On the G1 side, connect to any one of Type-C ports No.6, No.7, or No.8. Port No.9 is not used in this configuration.
- Confirm that the cable does not obstruct the RJ45 port, other USB ports, or mounting screws.
动作确认与最终收线動作確認と最終配線処理Operation Check & Final Cable Routing
7.1 动作确认動作確認Operation Check
- 清除安装区域内的工具和螺钉,确保人员远离关节运动范围。
- 开启机器人电源,分别确认左右灵巧手动作、方向及通信状态正常。
- 低速、小范围活动腕部和肘部,确认线缆无拉紧、夹住或摩擦。
- 如出现无动作、方向异常或异响,立即停止并断电后检查接线。
- 取付部周辺の工具・ねじを除去し、人体が関節可動範囲へ入っていないことを確認します。
- ロボット電源を入れ、左右ハンドの動作、方向、通信状態が正常であることを確認します。
- 手首・肘を低速・小範囲で動かし、ケーブルの張り、挟み込み、擦れがないことを確認します。
- 動作しない、方向異常、異音がある場合は直ちに停止し、電源 OFF 後に配線を確認します。
- Remove tools and screws from the installation area and make sure all personnel are clear of the joint motion range.
- Turn on the robot power and confirm that both hands operate correctly, move in the correct direction, and communicate normally.
- Move the wrist and elbow slowly through a small range and confirm that the cables are not pulled tight, pinched, or rubbing.
- If a hand does not move, moves in the wrong direction, or makes abnormal noise, stop immediately, turn the power OFF, and check the wiring.
7.2 最终收线最終配線処理Final Cable Routing
- 确认双手动作正常后,关闭机器人主电源。
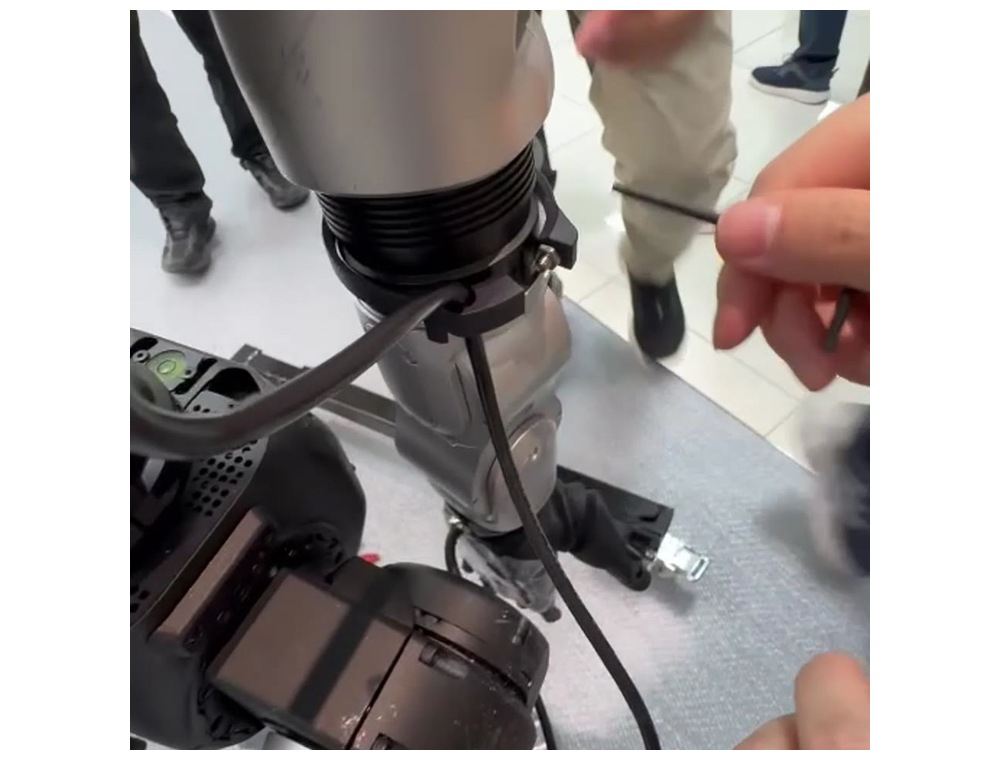
- 从腕部向上整理线缆,在腕、肘、肩关节前后保留平缓弧形余量。
- 使用卡扣、扎带或魔术贴轻度固定,不得压伤线缆外皮。
- 避免线缆接触锐边、螺钉头、运动部件或散热部件。
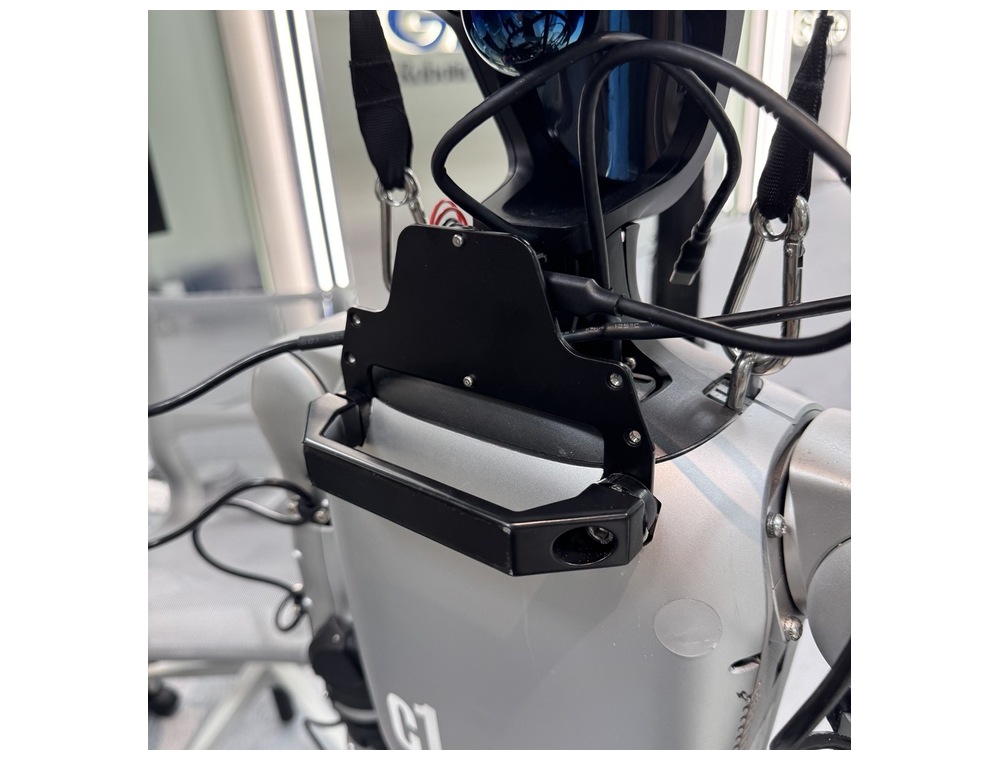
- 整理躯干上部多余线缆并复装保护盖。
- 左右ハンドの正常動作確認後、ロボットの主電源を切ります。
- 手首側から上方へ整理し、手首、肘、肩の前後に緩やかな余長を確保します。
- クリップ、結束バンド、面ファスナーで軽く固定し、ケーブル被覆を圧迫しないでください。
- 鋭利部、ねじ頭、可動部、発熱部への接触を避けます。
- 胴体上部の余剰ケーブルを整理し、保護カバーを復旧します。
- After confirming normal operation of both hands, turn off the robot main power.
- Route the cables upward from the wrist, leaving smooth slack before and after the wrist, elbow, and shoulder joints.
- Lightly secure the cables with clips, cable ties, or hook-and-loop straps without crushing the cable jackets.
- Keep the cables away from sharp edges, screw heads, moving parts, and heat-generating parts.
- Organize excess cable at the upper torso and reinstall the protective cover.
最终确认最終確認Final Check
- 左右灵巧手安装牢固,方向正确。
- 端子线序、电源端口及 Type-C 端口均已核对。
- 左右灵巧手动作正常,无异响。
- 各关节处线缆余量充分,无夹线和运动干涉。
- 扩展板支架、安全扶手及保护盖均已可靠固定。
- 左右ハンドが確実に固定され、方向が正しい。
- 端子配列、電源端子、Type-C 端子を確認済み。
- 左右ハンドが正常に動作し、異音がない。
- 各関節に十分なケーブル余長があり、挟み込みや可動干渉がない。
- 拡張基板ブラケット、安全ハンドル、保護カバーが確実に固定されている。
- Both hands are securely installed and oriented correctly.
- Terminal wire order, power connector, and Type-C port have been verified.
- Both hands operate normally with no abnormal noise.
- Sufficient cable slack remains at each joint, with no pinching or motion interference.
- The expansion-board bracket, safety handle, and protective cover are securely fastened.